Every time I want to get on with the Raspberry Pi topic, it goes back to the closet after a few days. The problem with running on a home server is so bothersome that we have to do everything ourselves, from installation to configuration. So while the very idea of using the device is wonderful, its implementation and spent time can surpass us. Therefore, it is worth realizing that the most changes are introduced by the method of small steps. By reusing the Raspberry Pi lying in the corner, the first step might be to run a simple ad-filtering DNS server on it. The next step could be configuring a VPN service to get from anywhere to home network devices.
Current server situation
As you know, I deal with photography. The problem that this creates is storing photos for processing. I have had many attempts to store photos on physical, portable and cloud drives. Unfortunately, none of these solutions proved to be 100% successful. The reasons were different. From problems with synchronization, disk filling, downloading blop from the clouds, disk loss or keeping photos only on one device. Therefore, the current solution I have is to use the NAS server with 2 TB storage itself. Of course, I’m not saying that this is the perfect solution, but it meets all my requirements at the moment. Almost. This fact forced me to take action and install two really nice server projects for Debian devices. Thanks to the operation, from today I can use and view my photo collections from anywhere. And in fact, I’m happy with the current result.
PiHole
I omit the information that I am starting the topic in reverse order as I was installing services on the Raspberry Pi. I am simply aware that this topic will be more interesting and will be useful to a wider audience. There is one reason. This is the fastest way to get rid of bothersome ads while surfing the internet. Most of us probably use the AdBlock browser plugin. Unfortunately, the last year shown that there is a way to found if plugin is enabled, and some sites catch it’s and show us pop-up messages. The second problem is installing it on every device, bypassing the phone — unfortunately we have to use a clean browser instance here… Therefore, a great choice is to use the DNS service, which will block ads from showing up from the very network level. The advantages for sure will be:
- no ads
- no popups asking for whitelisting the page
- faster page loading, because we do not load additional ad resources
- statistics
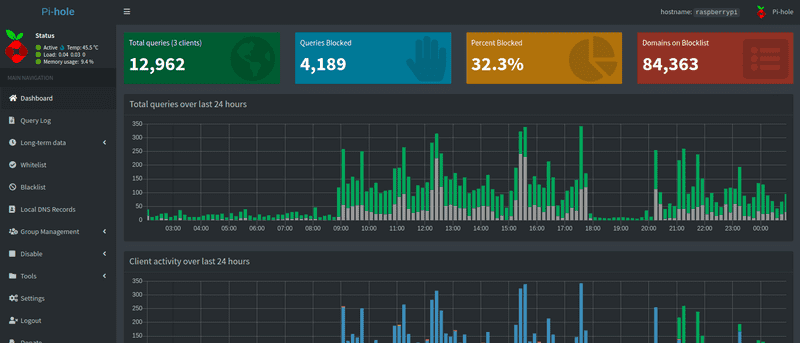
The project that can be used is widely discussed PiHole. Its simple installation allows to quickly load settings with ready-to-go configuration. The last step is only to enter the router itself and, if possible, set static IP for our Raspberry and replace the primary DNS IP with the address of our server in DHCP options. After that, we could probably see our PiHole panel under pi.hole domain address. In a few hours, it could show that likely 30% of network traffic on websites are ads. And we are free of them.
PiVPN
PiVPN is an interesting project that I came across recently by accident. It is based on the philosophy of simple, automatic installation, just like PiHole. During configuration, we have the option of choosing two sites for installation. These will be OpenVPN services probably known by the majority and WireGuard. During the selection, I suggested information about easier WireGuard configuration on mobile devices. And in fact, as it turns out, configuration and performance as well as lower battery consumption are really an advantage of WireGuard. After a long analysis of these two solutions, it turns out that the program itself is very optimal (the entire code takes only 4000 lines, so you can read it at lunch and make sure it is safe). Additionally, there is an option to generate connection keys and a QR code for mobile devices. So it turns out to be a good competition to OpenVPN. After installation, it is worth remembering about redirecting ports to the server and, if we do not have a static public IP address, use DDNS services.
And so…
Without much describing how to install the projects, because the entire manual is on their pages, I can say that the whole process took me two hours. Of course, this includes finding a card reader and writing a clean image for the Raspberry Pi. So, if in the evening someone does not know what they could do, and has some time, I encourage trying to install these two services and improve own home network.
Any action to the future can improve access to information needed in time. Therefore, it is worth taking advantage of this opportunity and installing these services ever for the future tasks.

